1. color
- 텍스트의 색상을 설정
- 기본값은 검정색
2. letter-spacing
- 텍스트 내에서 글자 사이의 간격을 설정
예) 안녕하세요. 오늘은 화요일.. 아직도?
>안 녕 하 세 요 . 오 늘 은 화 요 일 . . 아 직 도 ?
3. word-spacing
- 텍스트 내에서 단어 사이의 간격을 설정
예) 안녕하세요. 오늘은 화요일.. 아직도?
>안녕하세요. 오늘은 화요일.. 아직도?
예제코드
<!DOCTYPE html>
<html lang="en">
<head>
    <meta charset="UTF-8">
    <meta http-equiv="X-UA-Compatible" content="IE=edge">
    <meta name="viewport" content="width=device-width, initial-scale=1.0">
    <title>css 텍스트1</title>
    <style>
        .letter {letter-spacing: 5px; color: deepskyblue;}
        .word {word-spacing: 7px; color: deeppink;}
    </style>
</head>
<body>
    <h2>css 텍스트1</h2>
    <p>letter-spacing</p>
    <p><span class="letter">CSS의 letter-spacing 속성 테스트</span></p>
    <p>word-spacing</p>
    <p><span class="word"> CSS의 word-spacing 속성 테스트</span></p>
</body>
</html>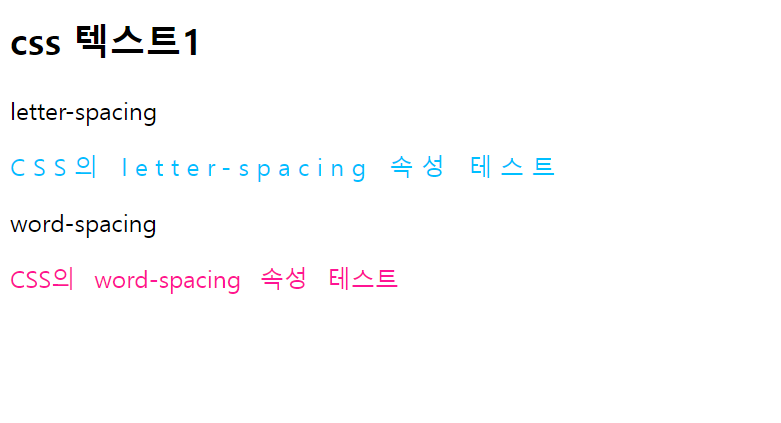
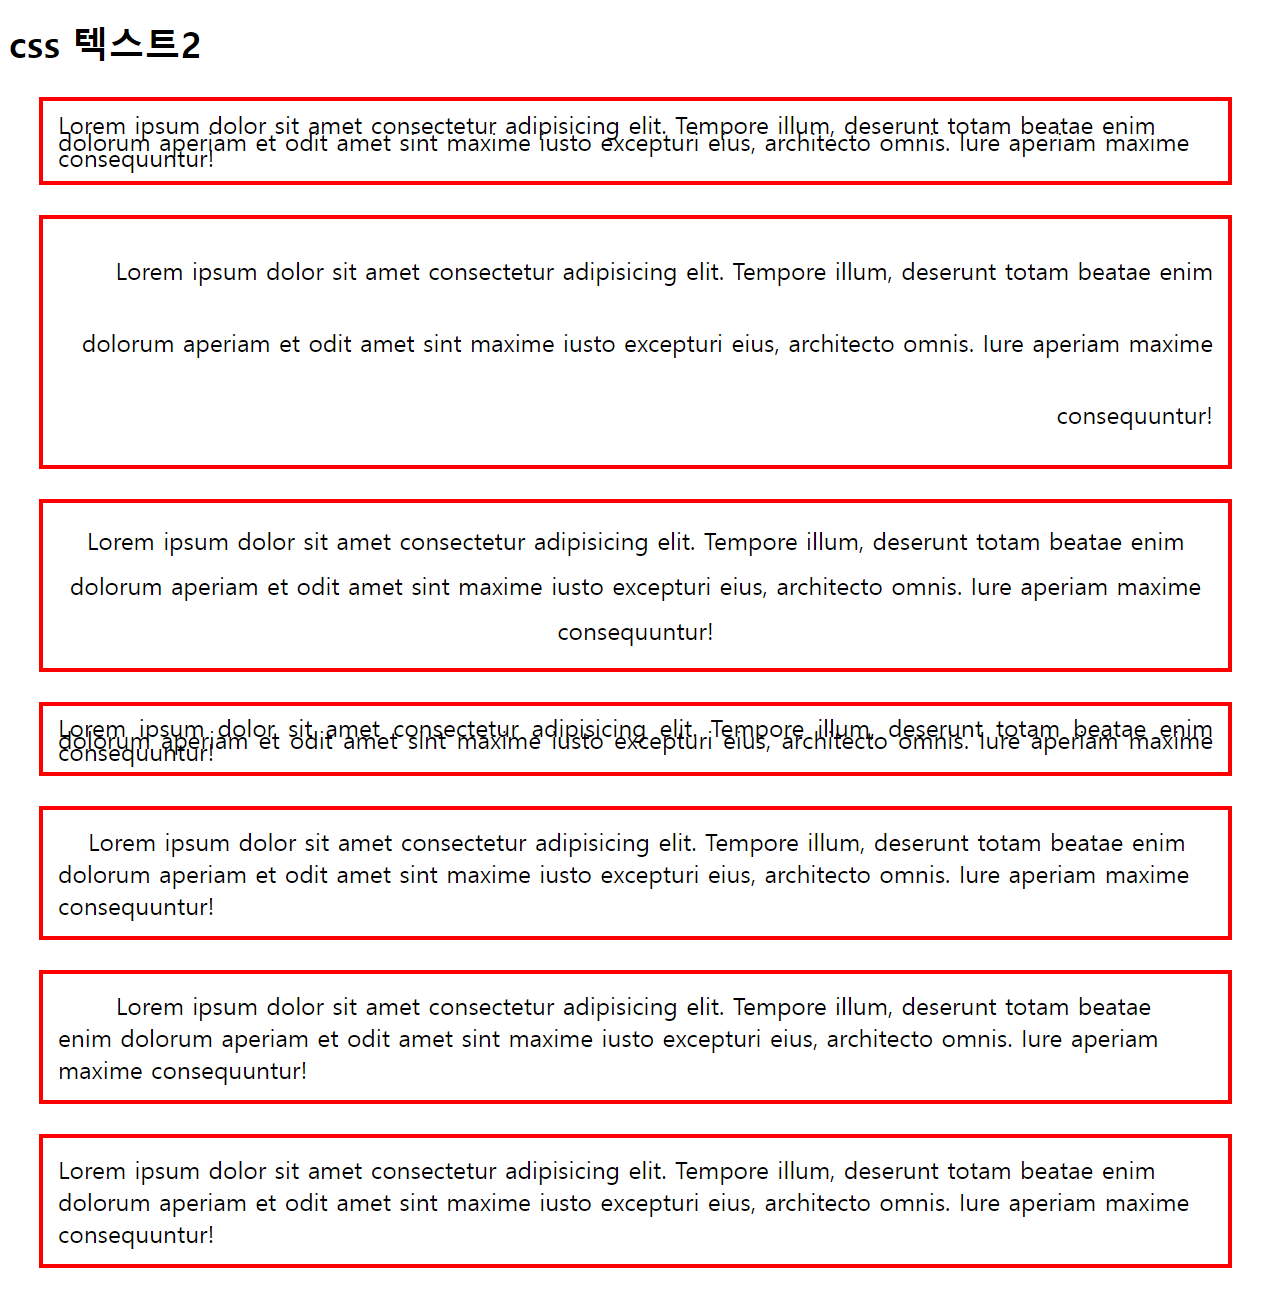
4. text-align
- 텍스트 수평방향 정렬을 설정(left, right, center, justify)
5. text-indent
- 단락의 첫 줄의 들여쓰기를 설정
6. line-height
- 줄 높이를 정하는 속성
예) 글자 크기가 40px일 때
line-height: 1.5 -> 줄 높이는 40px의 1.5배인 60px -> 글자 크기는 40px이므로 글자 위와 아래에 각각 10px의 여백이 생김 -> 만약 줄 높이가 글자 크기보다 작으면 세로 방향으로 글자가 겹침
예제코드
<!DOCTYPE html>
<html lang="en">
<head>
    <meta charset="UTF-8">
    <meta http-equiv="X-UA-Compatible" content="IE=edge">
    <meta name="viewport" content="width=device-width, initial-scale=1.0">
    <title>css 텍스트2</title>
    <style>
        p { border: 3px solid red; padding: 10px; margin: 20px;}

        #align-left {text-align: left;}
        #align-right {text-align: right;}
        #align-center {text-align: center;}
        #align-justify {text-align: justify;}

        #indent1 { text-indent: 20px;}
        #indent2 { text-indent: 5%;}

        .small-line {line-height: 0.7;}
        .big-line {line-height: 3;}
        .px-line {line-height: 30px;}
        .per-line {line-height: 50%;}
    </style>
</head>
<body>
    <h2>css 텍스트2</h2>
    <p id="align-left" class="small-line">Lorem ipsum dolor sit amet consectetur adipisicing elit. Tempore illum, deserunt totam beatae enim dolorum aperiam et odit amet sint maxime iusto excepturi eius, architecto omnis. Iure aperiam maxime consequuntur!</p>
    <p id="align-right" class="big-line">Lorem ipsum dolor sit amet consectetur adipisicing elit. Tempore illum, deserunt totam beatae enim dolorum aperiam et odit amet sint maxime iusto excepturi eius, architecto omnis. Iure aperiam maxime consequuntur!</p>
    <p id="align-center" class="px-line">Lorem ipsum dolor sit amet consectetur adipisicing elit. Tempore illum, deserunt totam beatae enim dolorum aperiam et odit amet sint maxime iusto excepturi eius, architecto omnis. Iure aperiam maxime consequuntur!</p>
    <p id="align-justify" class="per-line">Lorem ipsum dolor sit amet consectetur adipisicing elit. Tempore illum, deserunt totam beatae enim dolorum aperiam et odit amet sint maxime iusto excepturi eius, architecto omnis. Iure aperiam maxime consequuntur!</p>
    <p id="indent1">Lorem ipsum dolor sit amet consectetur adipisicing elit. Tempore illum, deserunt totam beatae enim dolorum aperiam et odit amet sint maxime iusto excepturi eius, architecto omnis. Iure aperiam maxime consequuntur!</p>
    <p id="indent2">Lorem ipsum dolor sit amet consectetur adipisicing elit. Tempore illum, deserunt totam beatae enim dolorum aperiam et odit amet sint maxime iusto excepturi eius, architecto omnis. Iure aperiam maxime consequuntur!</p>
    <p>Lorem ipsum dolor sit amet consectetur adipisicing elit. Tempore illum, deserunt totam beatae enim dolorum aperiam et odit amet sint maxime iusto excepturi eius, architecto omnis. Iure aperiam maxime consequuntur!</p>
</body>
</html>
7. text-decoration
- 텍스트에 여러가지 효과를 설정하거나 제거하는데 사용(none, underline, line-through, overline)
8. text-transform
- 텍스트에 포함된 영문자에 대한 대소문자를 설정(lowercase, uppercase, capitalize)
9. font-variant
- 소문자를 작은 대문자로 변경(small-caps)
예제코드
<!DOCTYPE html>
<html lang="en">
<head>
    <meta charset="UTF-8">
    <meta http-equiv="X-UA-Compatible" content="IE=edge">
    <meta name="viewport" content="width=device-width, initial-scale=1.0">
    <title>css 텍스트3</title>
    <style>
        a:link { text-decoration: none;}
        a:visited { text-decoration: none;}
        a:hover { text-decoration: underline;}
        a:active { text-decoration: underline;}

        h2 { font-size: 50px;}
        .through { text-decoration: line-through;}
        .variant { font-variant: small-caps;}
    </style>
</head>
<body>
    <h2>파이썬 창시자</h2>
    <p>귀도 반 로섬(네덜란드어: <span class="variant"> Guido van Rossum</span>, 1956년 1월 31일 ~)은 네덜란드 출신의 소프트웨어 엔지니어이다. 프로그래밍 언어인 파이썬을 개발한 것으로 유명하다. 2005년부터 2012년까지 구글에서 일했으며, 2013년부터 2019년 10월까지 드롭박스에서 일하고 있었다. <span class="through">은퇴하였다가</span> 2020년 11월 13일 MS에 다시 입사하였다.</p>
    <p><a href="https://ko.wikipedia.org/wiki/%EA%B7%80%EB%8F%84_%EB%B0%98_%EB%A1%9C%EC%84%AC">출처: 위키백과</a></p>
</body>
</html>
10. text-shadow
- 텍스트에 그림자 효과를 설정
선택자 { text-shadow: 가로길이 세로길이 번짐정도 색상; }예제코드
<!DOCTYPE html>
<html lang="en">
<head>
    <meta charset="UTF-8">
    <meta http-equiv="X-UA-Compatible" content="IE=edge">
    <meta name="viewport" content="width=device-width, initial-scale=1.0">
    <title>css 텍스트4</title>
    <style>
        h1{ font-size: 100px;}
        .shadow1 {color: deeppink; text-shadow: 10px 10px;}
        .shadow2 {color: deeppink; text-shadow: 10px 10px 5px;}
        .shadow3 {text-shadow: 10px 10px 5px red;}
        .shadow4 { color: #fff; text-shadow: 10px -10px 5px #000;}
        .shadow5 { color: #fff; text-shadow: 0 0 8px #000;}
    </style>
</head>
<body>
    <h2>css 텍스트4</h2>
    <h1 class="shadow1">css text-shadow 속성1</h1>
    <h1 class="shadow2">css text-shadow 속성2</h1>
    <h1 class="shadow3">css text-shadow 속성3</h1>
    <h1 class="shadow4">css text-shadow 속성4</h1>
    <h1 class="shadow5">css text-shadow 속성5</h1>
</body>
</html>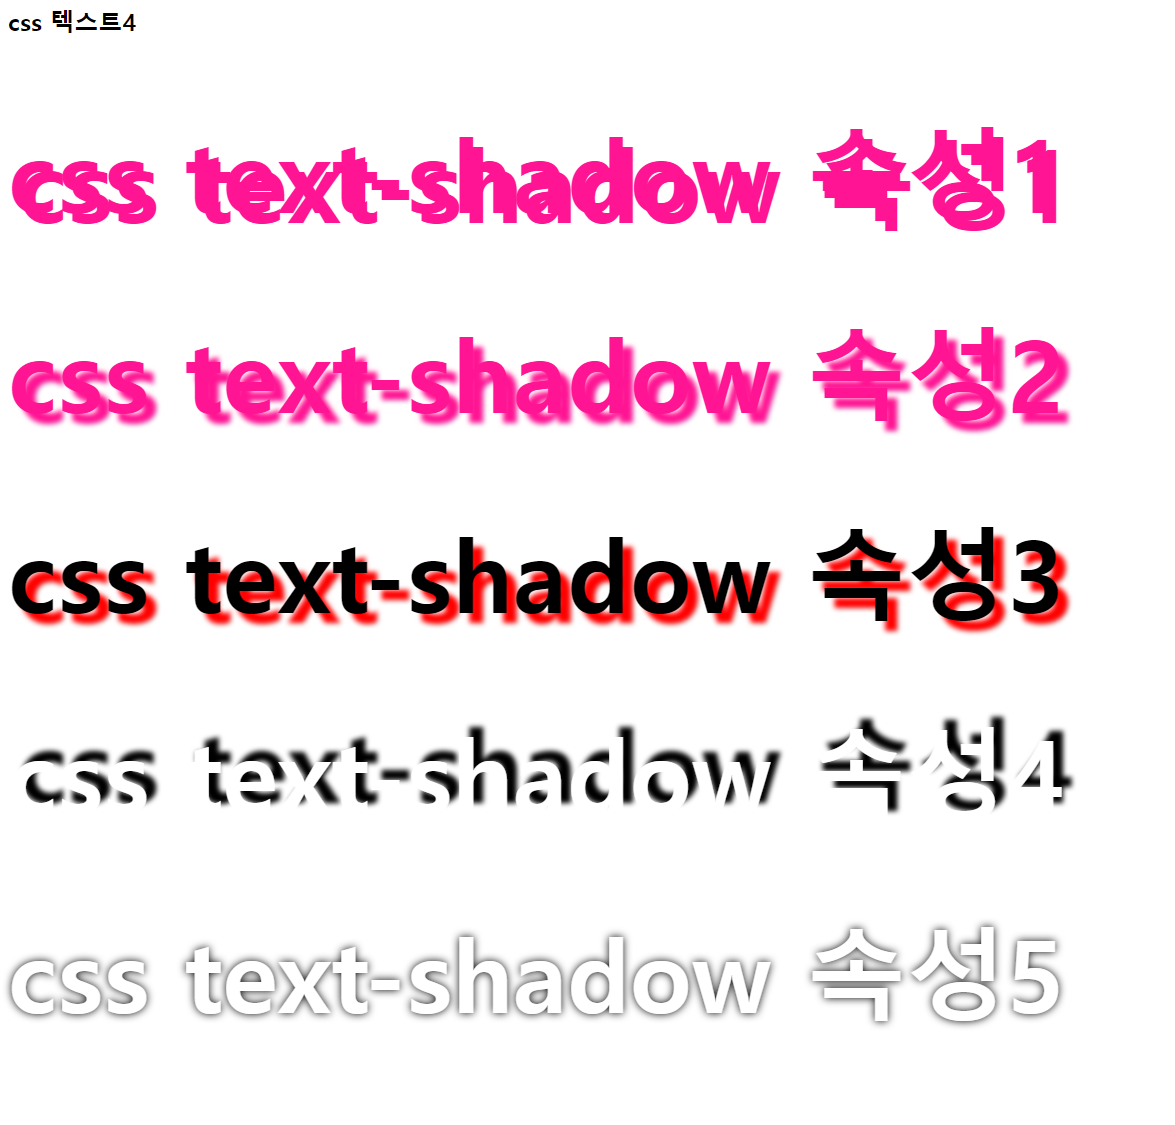
11. white-space
- 스페이스와 탭, 줄바꿈, 자동줄바꿈을 어떻게 처리할지 결정하는 속성(nowrap, pre, pre-wrap, pre-line)
12. text-overflow
- 텍스트를 줄바꿈 하지 않았을 때 넘치는 텍스트를 어떻게 처리할지 결정하는 속성(clip, ellipsis)
13. overflow
- 요소 내의 컨텐츠가 너무 커서 모두 보여주기 힘들 때 어떻게 보여줄지 결정하는 속성(visible, hidden, scroll, auto)
예제코드
<!DOCTYPE html>
<html lang="en">
<head>
    <meta charset="UTF-8">
    <meta http-equiv="X-UA-Compatible" content="IE=edge">
    <meta name="viewport" content="width=device-width, initial-scale=1.0">
    <title>css 텍스트5</title>
    <style>
        p {display: inline-block; width: 200px; border: 1px solid red;}
        .tof1 {white-space: nowrap; overflow: hidden; text-overflow: ellipsis;}
        .tof2 {white-space: nowrap; overflow: hidden; text-overflow: clip;}
        .of1 {height: 150px; overflow: scroll;}
        .of2 {height: 150px; overflow: hidden; overflow-y: scroll;}
        .content {
            border: 3px dotted palevioletred;
            width: 400px;
            padding: 10px;
            white-space: nowrap;
            overflow: hidden;
            text-overflow: ellipsis;
        }
        .content:hover {overflow: visible;}
    </style>
</head>
<body>
    <h2>css 텍스트5</h2>
    <p class="tof1">Lorem, ipsum dolor sit amet consectetur adipisicing elit. Ut suscipit natus corporis consectetur repellendus, placeat distinctio autem consequuntur asperiores vitae omnis exercitationem mollitia. Sapiente omnis sequi modi eveniet pariatur exercitationem.</p>
    <p class="tof2">Lorem, ipsum dolor sit amet consectetur adipisicing elit. Ut suscipit natus corporis consectetur repellendus, placeat distinctio autem consequuntur asperiores vitae omnis exercitationem mollitia. Sapiente omnis sequi modi eveniet pariatur exercitationem.</p>
    <p class="of1">Lorem, ipsum dolor sit amet consectetur adipisicing elit. Ut suscipit natus corporis consectetur repellendus, placeat distinctio autem consequuntur asperiores vitae omnis exercitationem mollitia. Sapiente omnis sequi modi eveniet pariatur exercitationem.</p>
    <p class="of2">Lorem, ipsum dolor sit amet consectetur adipisicing elit. Ut suscipit natus corporis consectetur repellendus, placeat distinctio autem consequuntur asperiores vitae omnis exercitationem mollitia. Sapiente omnis sequi modi eveniet pariatur exercitationem.</p>
    <p class="content">Lorem, ipsum dolor sit amet consectetur adipisicing elit. Ut suscipit natus corporis consectetur repellendus, placeat distinctio autem consequuntur asperiores vitae omnis exercitationem mollitia. Sapiente omnis sequi modi eveniet pariatur exercitationem.</p>
</body>
</html>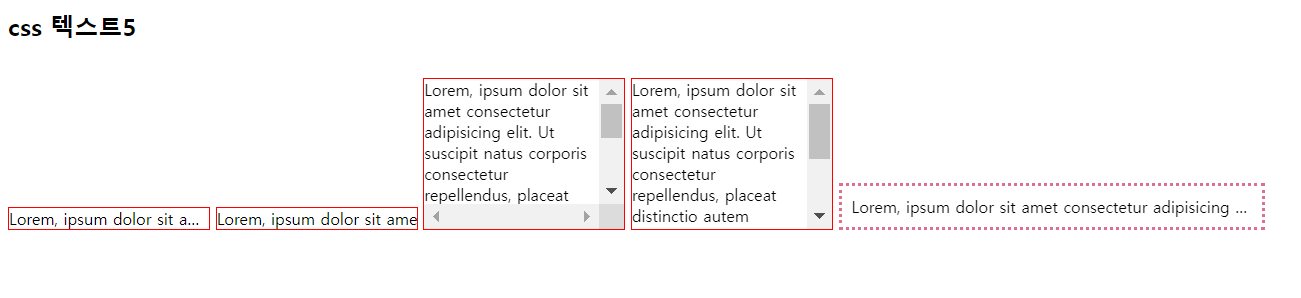
14. font-size
- 텍스트 크기를 설정
- px, %, em, rem
글꼴을 선택하는 방법:
- 누구나 설치되어 있는 기본 글꼴을 사용
- 이미지로 처리
- 클라이언트에 글꼴을 다운로드 시켜 사용
- 웹 폰트를 사용
16. font-weight
- 텍스트의 굵기를 설정
- 기본 굵기: 400,(범위100~900)
예제코드
<!DOCTYPE html>
<html lang="en">
<head>
<meta charset="UTF-8">
<meta http-equiv="X-UA-Compatible" content="IE=edge">
<meta name="viewport" content="width=device-width, initial-scale=1.0">
<title>css 텍스트6</title>
<link rel="preconnect" href="https://fonts.googleapis.com">
<link rel="preconnect" href="https://fonts.gstatic.com" crossorigin>
<link href="https://fonts.googleapis.com/css2?family=Sunflower:wght@300;500;700&display=swap" rel="stylesheet">
<style>
.sunflower1{font-family: 'Sunflower', sans-serif; font-weight:300;}
.sunflower2{font-family: 'Sunflower', sans-serif; font-weight:500;}
.sunflower3{font-family: 'Sunflower', sans-serif; font-weight:700;}
@font-face {
font-family: 'TTTtangsbudaejjigaeB';
src: url('https://cdn.jsdelivr.net/gh/projectnoonnu/noonfonts_2212@1.0/TTTtangsbudaejjigaeB.woff2') format('woff2');
font-weight: 700;
font-style: normal;
}
.budaejjigae { font-family: 'TTTtangsbudaejjigaeB'; font-weight:300;}
</style>
</head>
<body>
<h2> css 텍스트 </h2>
<p> 모든 사람은 인종, 피부색, 성, 언어, 종교, 정치적 또는 기타의 견해, 민족적 또는 사회적 출신, 재산, 출생 또는 기타의 신분과 같은 어떠한 종류의 차별이 없이, 이 선언에 규정된 모든 권리와 자유를 향유할 자격이 있다.</p>
<p class="sunflower1">모든 사람은 인종, 피부색, 성, 언어, 종교, 정치적 또는 기타의 견해, 민족적 또는 사회적 출신, 재산, 출생 또는 기타의 신분과 같은 어떠한 종류의 차별이 없이, 이 선언에 규정된 모든 권리와 자유를 향유할 자격이 있다.</p>
<p class="sunflower2">모든 사람은 인종, 피부색, 성, 언어, 종교, 정치적 또는 기타의 견해, 민족적 또는 사회적 출신, 재산, 출생 또는 기타의 신분과 같은 어떠한 종류의 차별이 없이, 이 선언에 규정된 모든 권리와 자유를 향유할 자격이 있다.</p>
<p class="sunflower3">모든 사람은 인종, 피부색, 성, 언어, 종교, 정치적 또는 기타의 견해, 민족적 또는 사회적 출신, 재산, 출생 또는 기타의 신분과 같은 어떠한 종류의 차별이 없이, 이 선언에 규정된 모든 권리와 자유를 향유할 자격이 있다.</p>
<p class="budaejjigae">모든 사람은 인종, 피부색, 성, 언어, 종교, 정치적 또는 기타의 견해, 민족적 또는 사회적 출신, 재산, 출생 또는 기타의 신분과 같은 어떠한 종류의 차별이 없이, 이 선언에 규정된 모든 권리와 자유를 향유할 자격이 있다.</p>
</body>
</html>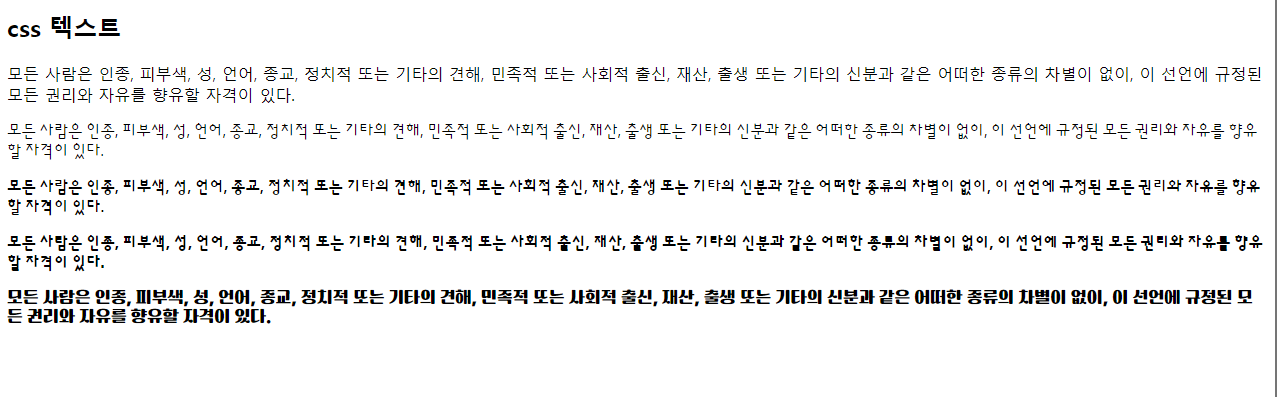
'KDT 수업 > HTML | CSS' 카테고리의 다른 글
| [CSS] 박스 모델 (Box Model) (0) | 2023.04.03 |
|---|---|
| [CSS] CSS 배경 (0) | 2023.04.03 |
| [CSS] CSS의 색상(color) (0) | 2023.03.30 |
| [CSS]선택자의 종류2 (0) | 2023.03.30 |
| [CSS]선택자의 종류1 (0) | 2023.03.30 |